
Wall stenciling and decals are all the rage in home décor. While I must admit they are gorgeous, some of them are a bit above my decorating budget. I did some investigating in my local hardware and stationery stores and have a devised a cheap and easy DIY version in 8 easy steps.

Tools for the Project:

If you’re artistic draw it by hand, but if you’re not blessed with creative skills, look for a pattern on the internet. Find one you like and print it. If it’s a large design you might need to go to a printer shop.
It’s important to measure the space you intend on stenciling if you plan on making your stencil a repetitive pattern. You need to make sure your pattern fits evenly in the space you want to fill.
Step 3: Prepare the Stencil Sheets
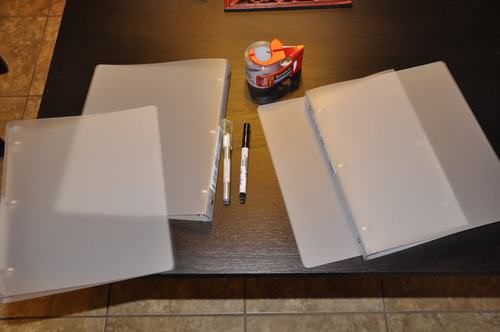
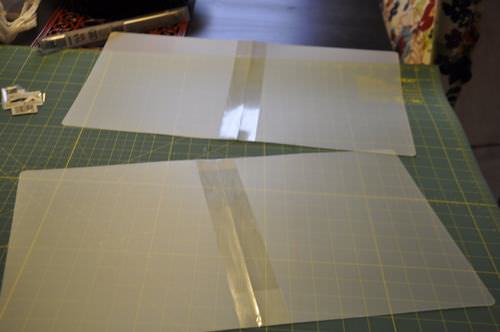
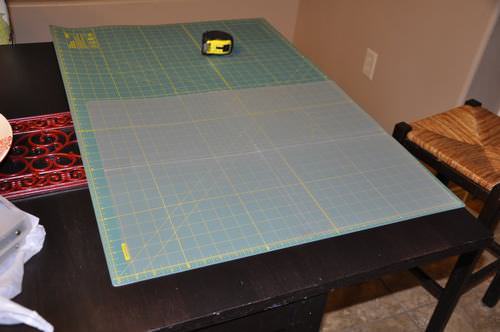
You can cheat and buy blank sheets at an art supplies store, but I found plastic folders and made my own. It’s cheaper and I have no use for a whole pack of 12 sheets, which is what the art supply store sells.
I bought plastic folders, cut them up, taped the pages together and used these as my stencil sheets. Make sure they fit your pattern in size. My design called for a 24 by 24 inch square (60x60cm). Other designs might be more oblong.
Step 4: Trace the Pattern


Place your printed image underneath the semi-transparent stencil sheet. You should be able to see the pattern clearly. Now you can trace the pattern using a marker.
Step 5: Cut the Stencil
Cut out the stencil using an Exacto knife (this allows for more precision). This step was the most time consuming part of the project. Press on a cutting mat in order not to ruin your desk or table.
In retrospect I would choose an less intricate pattern than the one I chose. This one was a bit ambitious and took a few days to do.
Step 6: Fix the Stencil on the Wall

You might need a ladder or something to stand on if your stencil needs to be high up the wall.
Two things you can do to make sure your stencil is firmly stuck to the wall:
If you’re worried that the image looks skew, use a level stick to ensure the design is straight.
Step 7: Painting The Stencil – The Fun Bit
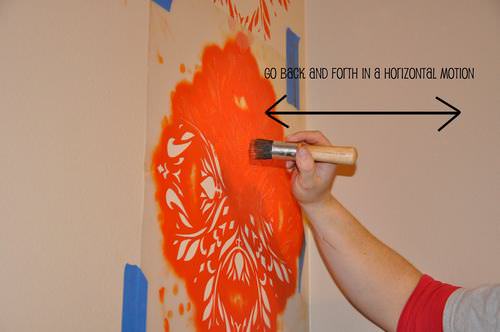

Using a stencil brush paint the cut out areas of your stencil. Some of you might find it easier to work with a sponge paint dabber.
I used stencil paint. It’s drier and doesn’t drip down the the other parts of the stencil. I used 6 bottles (1/2 fl oz, or 15ml each). The amount of paint you will need does depend on your design’s size and detailing. The paint takes 24 hours to become dry for touch.
Step 8: Repeat




How to Add Color and Beauty to Your Home!
Create beautiful looking art with ease and add it to your home.
 11:06
11:06
These Phone Stand Ideas Are Nothing Short of Awesome
It's way too easy simply to go out and buy your own phone stand - why not have a go at making your own at home? Here are 32 unique phone stand ideas.

10 Homemade Face Masks For All Skin Types and Problems
No matter what kind of skin you have; dry, oily, lifeless or burned, read this article and you'll learn how to make simple masks to nourish it!

You Don’t Need a Garden to Grow Fruits & Vegetables!
Why not grow your own produce in your own home?

These Delicious Ribs Will Make Your Mouth Water
Follow this recipe and you will get the best tasting ribs ever!

You're Just Two Steps Away from Completely Waterproof Shoes!
With this simple guide, you'll learn how to easily waterproof your fabric shoes and walk in the rain without fear of your feet getting wet!

Ever Hear of the 54321 Shopping Method to Buying Groceries?
Grocery shopping has become increasingly stressful as prices continue to climb. Many shoppers find themselves struggling to balance their budgets while still putting nutritious food on the table. But a straightforward shopping strategy is helping peo
 6:58
6:58
How to Make a Simple and Cheap Door Alarm!
Here's how you can save yourself some money by making your own door alarm at home.

11 Home Remedies for Children's Winter Ailments
Children tend to get a variety of diseases and infections during the winter. These 11 home- remedies will help you keep your kids healthy and relieve most of their symptoms.
 15:52
15:52
Stop Overpaying! Book Cheaper Flights With These Hacks
These six simple hacks will help you save hundreds on airfare.

Winter Weight Gain: Why It Happens and 5 Tips to Avoid It
Ever wondered why you tend to put on some extra pounds during the winter months? Find out why we gain winter weight and how we can avoid it.
 18:20
18:20
Your Day Is About to Get a Lot Easier with These Hacks
From making cooking easier to restoring household items, check out these incredible tips

12 Tips to Maximize Counter Space in Small Kitchens
These hacks will transform your kitchen counter space.
 8:47
8:47
12 Great Home Remedies to Cure Many Daily Ailments
Take note of these useful home remedies that will help you treat various daily ailments.

How to Take Fewer Trips to the Grocery Store
Struggling to visit the grocery store way too often, in light of the Covid-19 pandemic? These tips will help you shop for food more seldom...

19 Household Items You Need to Change Now
It's high time you change these household items.

8 Reasons Why You Should Always Have Shower Caps Handy!
Shower caps are a lot more useful than you could ever imagine. Take a look!
 12:55
12:55
7 Basic Tips For a Successful Garden
Every beginner gardener must hear this information! Practice these 7 rules to achieve consistent gardening success, no matter what you're growing.

Learn How to Lucid Dream With These Simple Techniques
A run down of lucid dreams: What they are, why people want to lucid dream, different techniques to help you lucid dream and how to stay in your lucid dream
Useful Tips to Have Your Dishwasher Run Smoothly For Years
Just 15 minutes of occasional cleaning and maintenance can make sure your dishwasher runs smoothly for years.

Green Noise: A New Sound for a Better Night’s Sleep
You’ve likely heard of white noise, but have you tried green noise?
12 Passport Mistakes That Could Ruin Your Next Trip
Here are some passport mistakes you should never make to ensure your journey goes smoothly from start to finish.

How 11 Everyday Actions are Shortening Your Car's Lifespan
These common mistakes are wrecking your car’s longevity.
 3:13
3:13
11 Great Ways to Use Plastic Hooks Around the House
11 ways to use plastic hooks to find creative solutions to household problems.
 4:01
4:01
Did You Know This Handy Trick?
How to divide paper into equal columns without having to calculate strange numbers. Simple life hack to help at school or in the office.

What Are Phishing Emails And How Can You Protect Yourself?
Phishing emails are a common method used by cyber criminals to steal people's data. These are 4 frequent scams you can look out for and avoid.

Useful & Professional Tips On Raising a Bilingual Child
Teaching your child 2 languages is one of the greatest gifts you can give them as a parent. Find out how to do it easy and effectively.

The EASIEST Plants to Grow in Containers
If you’re wondering which plants work best in container gardens, you’ve come to the right place.
 13:52
13:52
The Prettiest Colorful Indoor Plants to Grow at Home
Need a splash of vivid colors and fresh air in your home? Look no further than these beautiful indoor plants!

What's Lurking in these Everyday Items Can Impact Your Health
This chart will clearly explains how often you need to clean your things, alongside a list of instructions to help you out with your chores.

Relieve Itching With These 7 Useful Natural Tips
Here's a look at a few great home remedies that can work wonders to calm itchy skin.

This is the Ultimate Guide to Cleaning All Your Stuff!
How do you decide when to clean certain items? This guide will reveal all!

31 Genius Uses for Lemon That Are Worth Knowing
Did you know that lemons could help you clean, cultivate, and even give first aid? Discover 31 brilliant uses of lemon....

How to Choose the Right Type of Sunscreen for Your Skin
Here are 7 tips to help you protect your skin properly this summer.

Embracing Love After Divorce: A Guide to Dating Again
Single again after divorce? This is what you should do next…
Solve 18 Cooking and Food Storage Problems With These Tips
These 18 food tips will teach you how to prevent food from spoiling and will show you how to save time and effort in preparing certain foods

Learn About 12 Popular Spices in Their Natural Form
We've gathered 12 very common spices and included photos showing them as plants blooming in nature.
 4:00
4:00
5 Things You Should NEVER Do With an Automatic Transition
Auto mechanic Scotty Kilmer shares five common habits that can shorten the life of your automatic transmission.
 10:32
10:32
Boost Your Mood and Productivity at Home With These Tricks
Here are some nifty tips that will help lift your mood and productivity at home.
 4:34
4:34
7 Super Useful Embroidery Tips and Hacks
Get to know 6 tricks for creating beautiful embroidery designs on clothes—perfect for beginners, but also for those already familiar with the technique.
 8:02
8:02
DIY Dog Nail Trimming: Keep Your Pup's Paws Healthy
Why visit a vet to trim your pup's nails? Do it at home with these easy-to-follow instructions.

How to Safeguard Your Legacy Against Will Tampering
Understanding how will tampering happens, why it occurs, and what steps you can take to prevent it is essential for ensuring your legacy remains intact.

Cinnamon Isn't Just Delicious, It's Also Incredibly Helpful!
The best uses for cinnamon aren't necessarily in food, many of its benefits derive from the spice's anti-fungal, antibacterial and antioxidant prowess.
Here's How You Can Prevent and Treat Bed Bug Infestations
Here Are 7 of the most efficient ways of preventing and treating bed bug infestations.

How to Get Rid of 6 Common Pantry Pests
Don’t let pesky little bugs wipe out your expensive food supplies and learn how to recognize and get rid of 6 common pantry pests with this informative guide.
 28:22
28:22
Here’s Why Everyone Should Try 'No-Dig' Gardening
Grow plants year round with the no-dig gardening method.

How Often to Change Your Water Filter - 3 Filter Types
Regularly changing the water filter is crucial if you want to maintain clean drinking water. Here's how often you should change 3 common filter types

12 Things Car Thieves Don't Want You to Know...
Every 43 seconds, a car is being stolen in the United States, which is close to one million vehicles a year. These tips could prevent you becoming a victim.
To enable your Ad-Free Subscription, please fill the fields below
Your subscription was successful, now you can enjoy an ad-free experience!! Note: To make sure you get no ads, please make sure to log in to your account. If you are logged in already, then refresh the page. The subscription can be cancelled at any time.


