header print

5 Fabulous DIY Fashion Projects Done Simply!

When it comes to fashion, there are so many creative ways to cut corners and still look fabulous. Here are some great DIY fashion ideas for accessories and unique clothing pieces that prove that you don't need to spend your fortune to look fabulous!

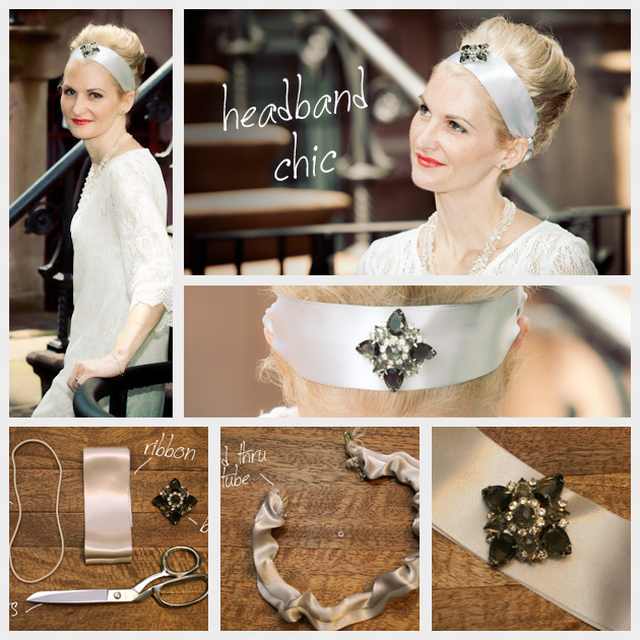
Satin Headband

diy fashion

Accessories are the key to a perfect outfit! This headband is the perfect touch to any elegant outfit, or a great gift for girlfriends that like to dress up! Oh, and it's really easy to make.


What You'll Need:


1 yard of satin ribbon (any color of your choosing)
1 strong elastic hair band
1 brooch
Pins
1 sewing machine
Scissors
2 safety pins


1. Cut your ribbon into 2 pieces about 13 inches in length each. Use the remaining ribbon to make a tube for the elastic that is also about 13 inches.


2. Take the last 13 inch piece and fold it in half lengthwise. Using a sewing machine, sew a seam that is as close to the edge as possible. Turn the piece right side out for a finished tube.


3. Cut out the elastic to a length of 10 inches. This is an estimate, but it is best to measure you head or the head of the person you are making it for to see that it fits snug.


4. Place safety pins on each end of the elastic and feed it through the satin tube. Now take the two pieces of remaining ribbon (also 13 inches each) and place one on either side of the satin tube with the elastic inside. Then, pin the ribbon down and sew it to the tube so that about a half inch of elastic remains extra (above the seam) on each side. At the end, trim any loose threads and the extra elastic.


5. Turn the headband around and attach the brooch at the center of the headband.


You're done! You should end up with a beautiful headband that is sure to spice up any outfit.


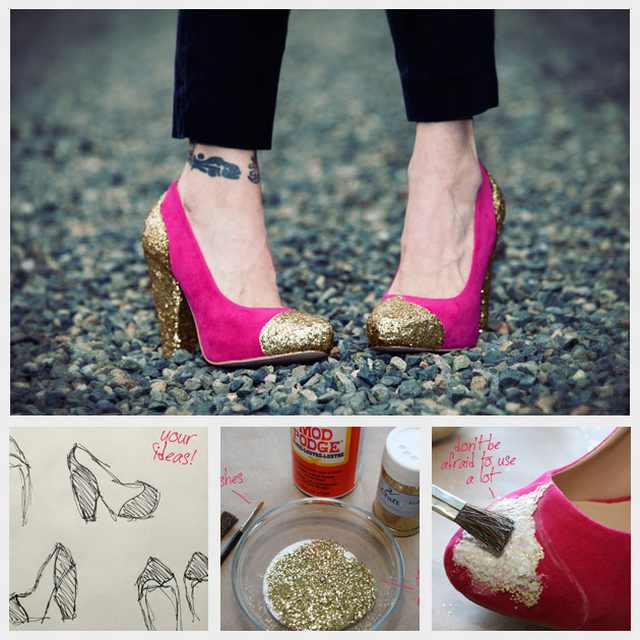
Glitter Shoes

diy fashion

If you've ever dreamt of being Dorothy in the Wizard of Oz, well here's your chance!


What You'll Need


Suede pumps in any color
Mod Podge
Glitter
Bowl
1 big and 1 small brush
White chalk


1. Decide where you want to add your design on the shoe. It may help to make a sketch.


2. Using the chalk, mark where you want to put your design. You can also use tape to mark off the area where you want to put the glitter.


3. Mix together the Mod Podge and the glitter in a small bowl. Then, take the big brush and paint the glitter/ Mod Podge mixture onto the shoe. Start in the middle and then work your way to the edges for accuracy. Once you have filled in most of the design, use the small brush to finish off the edges.


4. Place the shoes outside or by an open window to dry. Keep the glitter/ Mod Podge mixture to touch up the shoes after they have dried.


Viola! Your shoes are done! The glitter should harden well, but you can always touch them up with a bit of Mod Podge.


T-Shirt Scarf

diy fashion

Being on top of the latest fashions does not mean empting your bank account. Here is a stylish scarf that can easily and cheaply be made at home.


What You'll Need


1 T-shirt, the larger and wider the shirt, the chunkier the scarf will be
Scissors
Decoration elements
Hot glue gun


1. Cut the t-shirt from armpit to armpit lengthwise. Then, take the remaining tube and cut off the bottom hem.


2. Cut 3/4-1 inch wide strips from the top to the bottom, leaving about 1 inch uncat at the top. Once you have cut all the strips, pull on them to get them to curl.


3. Gather all the strips together in a loop at the top of the shirt (the uncut part) and cover the uncut section using whatever you have: leather, ribbon another piece of fabric. If you want, hot glue on some bead, jewels, buttons or chains to the top. Also, you can cut up some of the strips and braid them for a cool look.


Now you have a fashionable scarf that is easier than ever to make!


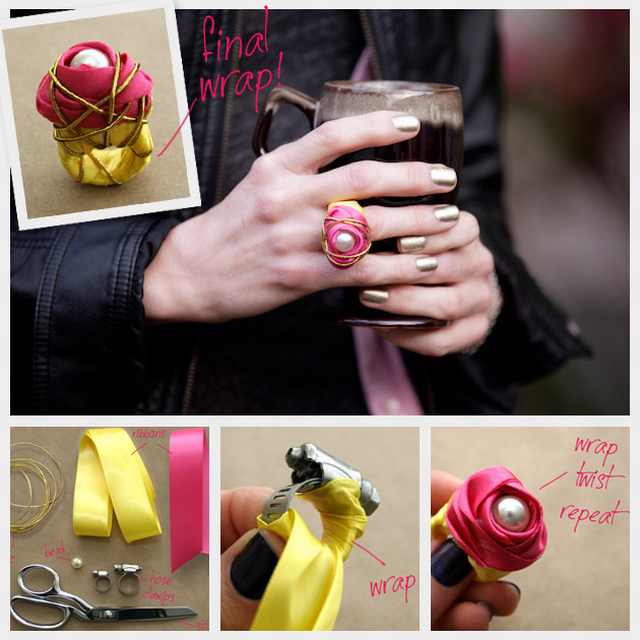
Ribbon Ring

diy fashion


For an expensive and glamorous look, all you need is a bit of ribbon, a pearl, and creativity!

What You'll Need


1 Hose Clamp (in most hardware stores)
2 Colors of Ribbons
Gold elastic
1 large bead or pearl
Scissors
Hot glue
Needle
Thread
Screwdriver


1. Adjust the hose clamp by loosening the screw at the top. Make sure that its very loose because as you wrap your ribbon it will get tighter.


2. Put a small drop of hot glue on the inside underneath the top of the hose clamp and attach the end of one of the ribbons. Then start wrapping the ribbon around the hose clamp, pulling it snug. Before you wrap the top part it is best to stop and check the size. Attach the end of the ribbon with hot glue to secure it.


3. Take the bead or pearl and threat a needle through it making a big loop that will cover the top of the hose clamp. Then, run the needle through the ribbon at the top, and before pulling it tight, add a drop of hot glue just under the bead. Make at least another two loops around the bead to secure it.


4. Take the second ribbon and fold it in half longways. Place a small dot of glue on the side of the ring and attach the end of the ribbon. Then start wrapping the ribbon around the top of the ring and twist as you go. When you finish, secure the ribbon with a drop of hot glue.


5. Then, take the gold elastic and tuck one end inside a fold in the ribbon, then secure it with hot glue as well. Start wrapping the elastic around the ring and pull it snug. When you are finished, cut the elastic and tuck the end inside another fold also to be secured with hot glue.


Your ribbon ring is done and ready to flaunt!


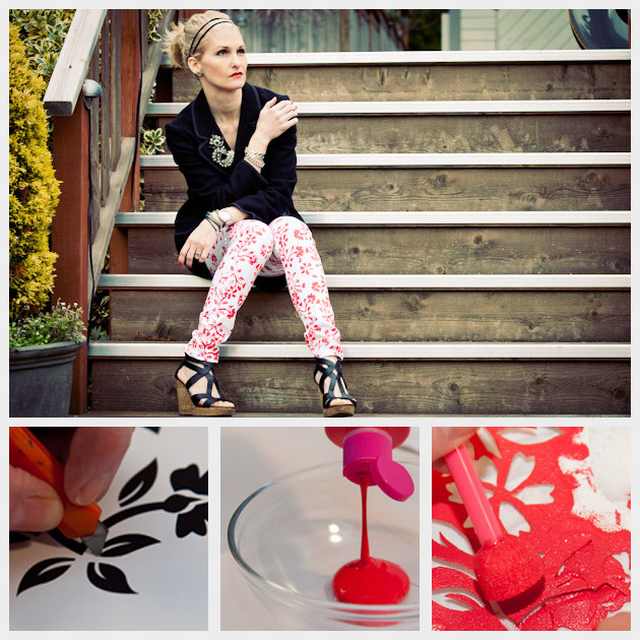
Floral Jeans

diy fashion

If you've been on the hunt for the perfect pair of floral jeans, well search no more. Here is a simple way to make floral jeans at home!


What You'll Need


A pair of white jeans
Fabric paint
Sponge
Floral stencil (can be purchased at craft stores or downloaded online)
X-acto knife


1. Use an X-acto knife to carefully cut out the stencil.


2. Lay out the jeans on a flat surface and decide how you are going to place the stencil. Make sure you keep the stencil in the same direction. You can try this out on a piece of paper or a used piece of cloth.


3. Pour some fabric paint into a small bowl. Then take another piece of paper or scrap fabric to test out the stencil and paint together.


4. Place the stencil on the jeans and hold it firmly in while you fill the stencil with the sponge full of pain. The thicker the paint on the jeans, the stiffer it will be when it dries.


5. Once you have painted the front of the jeans, allow the paint to dry (usually takes a couple of hours) before turning them over to paint the other side.


6. Then comes the waiting. You will need to wait about 72 hours before wearing or washing the jeans. When you do wash them, make sure that you turn them inside out before putting them in the washer. This is will help keep the paint from fading.

Now go strut your stuff in your beautiful floral jeans!

Submitted by user: Maria G.

Next Post
Sign Up for Free Daily Posts!
Did you mean:
Continue With: Facebook Google
By continuing, you agree to our T&C and Privacy Policy
Related Topics: girl stuff, clothes, fashion, DIY, accessories
Sign Up for Free Daily Posts!
Did you mean:
Continue With: Facebook Google
By continuing, you agree to our T&C and Privacy Policy